/handbook/developing-for-block-editor-and-site-editor/implementing-block-variations/
What We Do
Digital Platform MigrationsKey SolutionsManaged ServicesStaffing SolutionsIndustriesProducts


OnePress
Unify multiple brands on one governed WordPress platform.

Design & UI/UX
Gutenberg-native UX, UI, and design systems for visitors and editors.

WordPress Modernization
Modernize WordPress for better performance, architecture, and AI readiness.

WordPress as a DXP
WordPress as a composable DXP when monolithic systems no longer cut it.

Headless WordPress
Omnichannel content delivery without sacrificing marketing autonomy.

Frappe/ERPNext
Build scalable ERP and custom applications, from implementation to ongoing support.

Discovery
Strategic consultancy & project roadmap

Growth Services
On demand development & consultation

Site Maintenance
Annual maintenance. Done for you

QE Services
Testing across SDLC for assured quality

Hosting Migration
Move to a performant hosting with zero downtime

WooCommerce
Enterprise commerce delivered without lock-in

AI
Unlock real use cases and integrations

All Services
A suite of services for any need
Technology STACK


eCommerce
Scale your e-commerce with WooCommerce, integrations, and custom extensions for growth.


EasyEngine
Server management tool that makes using WordPress on Nginx easy.

Web Auditor
Performance Audit & Insights for your Website.

rtMedia
A complete media management plugin for WordPress.
Resources


About Us



CLEAR
 Resources Developing for Block Editor and Site Editor Extending the editor Implementing block variations
Topics
On this page
What Are Block Variations?
Difference Between Block Variations and Block Styles
Benefits for Developers and Designers
Simplifying Content Creation
Improving User Experience
Core Components of a Block Variation
Attributes
InnerBlocks
Styles
Creating a Basic Block Variation
Register a Block Variation Using registerBlockVariation
Creating Basic Variations for Core Blocks
Using block.json
Block Variation Performance Optimization
Avoiding Bloated CSS/JS
Conditional Asset Loading
Minimizing Asset Footprint
Last updated on Mar 31, 2026
Implementing Block Variations
Block variations in WordPress allow you to create multiple versions of the same block with different settings or layouts. This feature makes it easy for developers to offer various configurations without creating entirely new blocks and gives users flexibility in design.
In the image below, you can see a variation of the Paragraph Block. This variation is set up to display the current post’s primary category (or term). It includes custom settings to pull in content, apply a specific class, and show placeholder text in the editor.
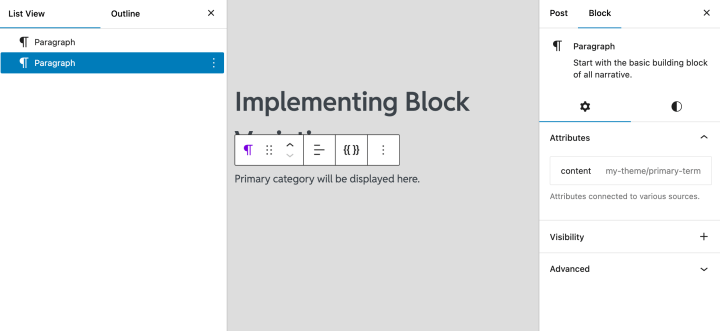
Block binding of primary term to paragraph block
What Are Block Variations?
Block variations are alternative setups of the same block. Instead of creating a new block every time you need a different look or layout, you can use variations to modify the existing block’s attributes. These variations help users apply different configurations quickly, saving time and effort.
For example, a Button Block can have variations like:
- Primary button: with rounded corners.
- Secondary button: with a more neutral color.
Both are still “buttons” but serve different roles, depending on the page’s needs.
Difference Between Block Variations and Block Styles
Block variations and block styles may sound similar, but they have different purposes.
- Block Variations: These change how the block functions or is structured. For example, you can alter layouts or add fields.
- Block Styles: These only change the look, such as colors, fonts, or borders, while keeping the structure the same.
Example:
In a Testimonial Block, a variation might offer single-column or multi-column layouts. A style would only change the appearance, like adding a border or adjusting text color.
Benefits for Developers and Designers
Block variations are great for both developers and designers because they:
- Promote code reuse: Use the same block for different layouts instead of writing new ones from scratch.
- Reduce clutter: Fewer blocks mean a cleaner block editor interface, making it easier to manage.
- Speed up workflows: Designers can define different variations, allowing developers to implement them without reinventing the wheel.
For example, a Hero Section Block could have one layout for text on the left and another with the image on top, using the same block with different variations.
Simplifying Content Creation
Block variations make it easier for non-technical users to build pages. Users don’t have to manually tweak settings for each block. They can choose from pre-configured options that suit their design needs. This means less time spent adjusting each block and more focus on content creation.
For example, an eCommerce store could have a Product Display Block with:
- Grid layout for product listings.
- Carousel layout for featured products.
The user simply selects the variation that works best, without needing any coding knowledge.
Improving User Experience
A cluttered block editor can overwhelm users, especially with too many block options. Block variations help streamline the interface by grouping different configurations into a single block. This keeps the editor clean and user-friendly.
For instance, instead of having three separate blocks for a gallery (Grid, Slideshow, Masonry), you can offer one Gallery Block with different layout variations. Users can pick the layout they want without scrolling through endless blocks.
Core Components of a Block Variation
Block variations offer flexibility by allowing you to modify existing blocks without having to build new ones from scratch. To achieve this, it’s important to understand the core components that define and customize block variations. These include attributes, InnerBlocks, and styles, which all play a significant role in how a block variation behaves and looks.
Attributes
Attributes define the specific properties of a block variation, such as layout, color, size, or any other block-specific configuration. These properties are crucial for differentiating between variations while still maintaining the core functionality of the original block.
Defining Attributes in Block Variations
When creating block variations, attributes determine the content or layout structure of the block. For instance, you can specify attributes for a Button Block to control its background color, text color, size, and alignment.
Here’s an example of defining attributes for a block variation of the Button Block:
			wp.blocks.registerBlockVariation("core/button", {
    name: "primary-button",
    title: "Primary Button",
    attributes: {
        backgroundColor: "blue",
        textColor: "white",
        className: "primary-button",
        fontSize: "large",
    },
});
In this case, we’re defining attributes like backgroundColor, textColor, and fontSize for the Primary Button variation. The className attribute is also important as it allows us to apply custom styles later.
Example: Customizing Block Attributes
Imagine a Gallery Block where users can switch between different layouts like Grid and Masonry. You can define variations by setting different attributes for each layout.
			wp.blocks.registerBlockVariation("core/gallery", {
    name: "masonry-layout",
    title: "Masonry Layout",
    attributes: {
        layout: "masonry", // Custom attribute for layout type
    },
});
This code registers a Masonry Layout for the Gallery Block. Here, the layout attribute controls the structural arrangement of the images, offering a more dynamic display for gallery content.
State and Attribute Handling
When defining attributes in block variations, it’s essential to manage default states and ensure that variations behave as expected. Attributes can define the default state of a variation, which is activated when the block is first added to the editor. Properties like isDefault ensure that the block variation automatically applies unless the user chooses otherwise.
InnerBlocks
InnerBlocks are a powerful feature of block variations because they allow you to nest other blocks inside a variation. This is useful for creating more complex blocks where the layout or content can include multiple different components.
How InnerBlocks Can Be Modified
You can modify InnerBlocks within a variation by setting up a structure where the parent block contains child blocks. This makes it possible to define different layouts that nest multiple content types.
For example, a Testimonial Block might allow you to include an image, quote, and author details, each as nested blocks within a group:
			wp.blocks.registerBlockVariation("core/group", {
    name: "testimonial",
    title: "Testimonial Block",
    attributes: {
        className: "testimonial-block",
    },
    innerBlocks: [
        ["core/image", {}],
        ["core/paragraph", { placeholder: "Enter testimonial text here" }],
        [
            "core/paragraph",
            { placeholder: "Author Name", className: "author-name" },
        ],
    ],
});
Here, the block variation creates a Testimonial Block with an InnerBlock structure that includes an image, quote text, and the author’s name. The innerBlocks property specifies the child blocks that the variation will automatically include.
Common Use Cases for InnerBlocks
- Hero Section: A block variation for a Hero Section might include nested blocks for a heading, subheading, and a call-to-action button.
- Multi-Column Layouts: A variation of a Columns Block could define different column structures with specific blocks inside each column.
Styles
Block variations allow you to apply custom styles, either by overriding the default styles of the block or by adding entirely new CSS classes that give each variation its unique appearance.
Overriding Default Styles
When you create a block variation, you can override the default block styles to match the variation’s purpose. For example, you might want a Call-to-Action Button to have a different look from the default button style:
			wp.blocks.registerBlockVariation("core/button", {
    name: "cta-button",
    title: "CTA Button",
    attributes: {
        backgroundColor: "red",
        textColor: "white",
    },
    className: "cta-button",
});
Here, the cta-button variation applies a red background with white text, overriding the default button styles. The className attribute helps assign the necessary CSS for the style changes.
Custom CSS Classes for Block Variations
You can also use block variations to assign specific CSS classes for more granular styling. These classes are defined in your block’s registration, making it easy to target specific variations with unique styles.
			{
    "name": "cta-button",
    "attributes": {
        "className": "cta-button",
        "backgroundColor": "red",
        "textColor": "white"
    }
}
In the block.json file, defining a custom class allows developers to target that specific variation for styling, creating a consistent and reusable design system.
Using isActive for Styles
When registering block variations, the isActive state can help dynamically apply certain classes or styles when a block is active in the editor. This is particularly useful for ensuring that certain variations always load with the correct appearance or behavior.
Example:
isActive: (blockAttributes) => blockAttributes.backgroundColor === 'red'
In this case, the isActive property checks if the button’s background color is red to determine if the CTA Button variation is active. This ensures that the appropriate styles are applied when the variation is selected.
Creating a Basic Block Variation
In this section, we’ll dive into the step-by-step process of creating a basic block variation. You’ll learn how to use the registerBlockVariation method, customize core blocks like Buttons or Images, and manage block variations using the block.json file. Let’s keep it practical and developer-friendly!
The beauty of block variations is that you don’t need to create an entirely new block from scratch, you can extend existing blocks with different configurations or appearances.
Register a Block Variation Using registerBlockVariation
Here’s a straightforward way to register a block variation using the registerBlockVariation function provided by the Gutenberg API. This method allows you to add different variations of an existing block (e.g., changing its default attributes or adding new ones).
Let’s start with the basics. Suppose you want to create a Primary Button variation for the core Button Block:
			wp.blocks.registerBlockVariation(
    "core/button", // Reference to the existing core block
    {
        name: "primary-button", // Unique identifier for the variation
        title: "Primary Button", // Display name in the block editor
        attributes: {
            backgroundColor: "blue",
            textColor: "white",
            className: "primary-button",
        },
        icon: "star-filled", // Icon shown in the block selector
        isDefault: true, // Set this as the default block variation
    }
);
What’s happening here?
- core/button: This is the block we’re extending (the core Button Block).
- name: A unique identifier for your block variation. Each variation must have a unique name.
- title: This is what the user sees in the editor when selecting a block variation.
- attributes: This is where you define the block’s properties, such as colors, layout, or text.
- icon: The icon displayed in the editor next to the variation name.
- isDefault: When set to true, this variation will be the default option when the block is added to the page.
This will register a Primary Button variation, preconfigured with a blue background, white text, and the custom class primary-button.
Creating Basic Variations for Core Blocks
You can register variations for any of the core blocks. Let’s extend the Image Block to create a custom variation for a gallery with a Masonry Layout.
			wp.blocks.registerBlockVariation("core/gallery", {
    name: "masonry-gallery",
    title: "Masonry Gallery",
    attributes: {
        layout: "masonry", // Custom layout for the gallery
        className: "masonry-gallery",
    },
    icon: "grid-view",
});
Here, we create a Masonry Gallery variation for the Gallery Block with a custom layout attribute (layout: ‘masonry’). This tells WordPress that the images in the gallery should be displayed in a masonry-style layout.
Where it gets useful: You can use this method for different variations like grid layouts, carousel galleries, or other content display options without needing a new block each time.
Adding Variation-Specific Attributes
Attributes play a significant role in customizing the behavior and appearance of each variation. They allow you to predefine settings like colors, icons, or layout structures that change based on the user’s selection.
Here’s how you can define variation-specific attributes:
			wp.blocks.registerBlockVariation(
    "core/heading",
    {
        name: "fancy-heading",
        title: "Fancy Heading",
        attributes: {
            level: 2, // Heading level (H2)
            textColor: "purple", // Custom text color
            className: "fancy-heading",
        },
        icon: "editor-textcolor",
    }
);
This example registers a Fancy Heading variation for the Heading Block, where the heading is an H2 (level: 2), styled with purple text (textColor: ‘purple’). The attribute className: ‘fancy-heading’ gives you a CSS hook for custom styling.
Using block.json
While using JavaScript for defining block variations is one option, the modern approach encourages the use of block.json simplifying the registration process. This makes your code cleaner and easier to maintain, especially when managing multiple blocks and variations.
Defining Block Variations in block.json
Let’s see how you can define a variation directly in the block.json file. This file helps to configure blocks declaratively, which is great for performance and compatibility with future WordPress updates.
Here’s how you would define a Primary Button variation in block.json:
			{
    "name": "core/button",
        "variations": [
            {
                "name": "primary-button",
                "title": "Primary Button",
                "attributes": {
                    "backgroundColor": "blue",
                    "textColor": "white",
                    "className": "primary-button"
                },
                "isDefault": true,
                "icon": "star-filled"
            }
        ]
}
What’s happening here?
- variations: This key allows you to define multiple variations under the block. Each variation has its name, title, attributes, and icon.
- attributes: Just like in the JS approach, this defines the properties for the block variation.
- isDefault: This sets the variation as the default option.
- icon: The icon displayed in the block editor next to the variation.
Once added to the block.json file, WordPress automatically registers this variation, making your code easier to maintain.
Key Properties in block.json for Block Variations
Here are some key properties you can define in block.json:
isDefault: Marks the variation as the default option when the block is inserted. This is useful for setting a baseline that users can modify later.attributes: Pre-defines settings like colors, layouts, and more. You can pass any custom attributes needed for your variation.icon: Specifies the icon for your variation in the block editor. You can use any available WordPress dashicons or a custom SVG.description: Provides additional context for the variation in the block editor. This helps users understand the purpose of each variation.
Here’s an example with an icon and a description added:
			{
    "name": "core/gallery",
        "variations": [
            {
                "name": "masonry-gallery",
                "title": "Masonry Gallery",
                "attributes": {
                    "layout": "masonry",
                    "className": "masonry-gallery"
                },
                "description": "Display images in a masonry layout.",
                "icon": "grid-view"
            }
        ]
}
Takeaway: Using block.json makes the block registration process more declarative, reducing the amount of JavaScript required and keeping your codebase clean.
Block Variation Performance Optimization
Optimizing the performance of block variations is crucial for ensuring your WordPress site remains fast and efficient. Poorly optimized block variations can lead to slow page loads, increased server requests, and bloated CSS/JS files, all of which can negatively impact user experience and SEO rankings. Let’s break down the best practices to avoid these issues and ensure optimal performance.
Avoiding Bloated CSS/JS
One of the main performance concerns when creating block variations is the unnecessary loading of CSS and JavaScript files. If you don’t handle the asset loading properly, your page could end up pulling in CSS and JS files for all variations, even if only one variation is being used.
The Issue:
Without careful planning, every block variation could end up loading its own CSS/JS files across the site, whether or not that variation is present on the page. This leads to CSS/JS bloat, where unnecessary assets are loaded, causing slow page load times.
The Solution:
Use conditional loading to ensure that assets are only loaded when the corresponding variation is used. For instance, you can conditionally load CSS for a variation in the block editor or front end by checking whether the variation is present.
Example:
			if ( wp.blocks.isRegisteredBlockVariation('core/button', 'primary-button') ) {
    wp_enqueue_style( 'primary-button-style', get_template_directory_uri() . '/css/primary-button.css' );
}
In this example, the primary button CSS is only enqueued if the “Primary Button” variation is registered and used.
Conditional Asset Loading
Conditional loading ensures that the assets (CSS/JS) required for a block variation are only loaded when that variation is used. This approach minimizes unnecessary HTTP requests and reduces the amount of code that the browser needs to parse, speeding up page loads.
How to do it:
- Frontend Conditional Loading: When the block variation is rendered on the front end, check if the variation is used and load the corresponding assets dynamically.
- Editor Conditional Loading: Similarly, load only the assets needed for the editor when the user selects a particular variation in the block editor.
Here’s a practical approach for conditionally loading assets in WordPress:
			function enqueue_variation_styles() {
    if ( has_block( 'core/gallery', get_the_ID() ) ) {
        wp_enqueue_style( 'masonry-gallery-style', get_template_directory_uri() . '/css/masonry-gallery.css' );
    }
}
add_action( 'wp_enqueue_scripts', 'enqueue_variation_styles' );
This checks whether the Masonry Gallery Block is present on the page and only enqueues the CSS for that layout if necessary. This way, the assets are conditionally loaded, avoiding performance issues caused by loading unnecessary styles.
Minimizing Asset Footprint
Lazy Loading and Efficient Asset Management
Another important technique for optimizing block variation performance is lazy loading. This technique allows you to defer the loading of assets or content until it’s needed (e.g. when it becomes visible on the screen). This is particularly useful for blocks that are resource-heavy, such as image galleries or video blocks.
How to Implement Lazy Loading:
Lazy Load Images or Media: Use the loading="lazy" attribute for images or iframes in your block variations. This ensures that media assets are only loaded when they are visible in the viewport.
Example:
<img src="example.jpg" loading="lazy" alt="Lazy loaded image">
Defer JavaScript Loading
For block variations that use interactive JS elements (like sliders or carousels), defer the loading of JavaScript until the user interacts with the block or scrolls to that section.
Example:
<script src="example-carousel.js" defer></script>
Optimizing Asset Delivery
Make sure you’re using minified CSS/JS files for your block variations to reduce the size of the assets being delivered. Tools like Webpack or Gulp can help you minify assets automatically.
Takeaway: Lazy loading ensures that your site only loads assets when they are needed, improving initial page load times and overall performance.
Creating custom block toolbar
PREVIOUS
Creating custom block controls
NEXT
Credits

Shreya Agarwal
Author
Shreya Agarwal
Author
Shreya Agarwal is a Growth Engineer at rtCamp, she brings active, hands-on WordPress development credentials to everything she writes and reviews. A WordPress Core Contributor with merged pull requ…

Good Work. Good People.
Industry partnerships


Compliance certifications


 United States India
© rtCamp Inc. since 2009. All rights reserved.
Terms of Service · Privacy Policy · Trust Center
Company
Solutions
Subscribe to our newsletter and get a few email updates every month.
United States India
© rtCamp Inc. since 2009. All rights reserved.
Terms of Service · Privacy Policy · Trust Center
Cookie Consent
We value your privacy
We use cookies to give you the best possible experience. By clicking “Accept,” you consent to our use of cookies to improve site functionality, analyze usage, and personalize content and communications. Your privacy matters to us, and we are committed to handling your data responsibly and transparently. Please check our Privacy Policy for more details.
Manage PreferencesDon’t AllowAllow All
Why do we use cookies?
×
By clicking "Accept" or "Decline All" at the bottom, you consent to the use of cookies and other tools as described in our Cookie Policy in accordance with your settings and accept our Terms of Service.
Toggle EssentialEssential
Essential cookies enable basic functions and are necessary for the proper function of the website.
Name
Description
Duration
Geolocation Config
This cookie is used to store the consent settings based on the visitor's location.
30 days
Cookie Preferences
This cookie is used to store the user's cookie consent preferences.
30 days
Toggle CloudFlareCloudFlare
CloudFlare provides web performance and security solutions, enhancing site speed and protecting against threats.
Service URL: developers.cloudflare.com (opens in a new window)
Name
Description
Duration
cf_clearance
Whether a CAPTCHA or Javascript challenge has been solved.
session
Toggle CommentsComments
These cookies are needed for adding comments on this website.
Name
Description
Duration
comment_author
Used to track the user across multiple sessions.
Session
comment_author_email
Used to track the user across multiple sessions.
Session
comment_author_url
Used to track the user across multiple sessions.
Session
Toggle GodamGodam
GoDAM" is primarily a specialized WordPress plugin and media management service designed to enhance video hosting, marketing, and asset management directly within the WordPress dashboard.
Service URL: godam.io (opens in a new window)
Name
Description
Duration
user_image
Temporarily stores the path to the user's avatar or profile picture for quick rendering in the website header.
session
user_id
Stores the numerical ID of the logged-in user to maintain session continuity and basic site operations.
session
full_name
Stores the logged-in user's display name to personalize the site interface without needing database queries.
session
system_user
First-party cookie used to store basic application state identifying the current system user role.
session
sid
A generic session ID cookie used to maintain user state and functionality as the visitor navigates through the site.
session
Toggle Google reCAPTCHAGoogle reCAPTCHA
Google reCAPTCHA helps protect websites from spam and abuse by verifying user interactions through challenges.
Name
Description
Duration
_GRECAPTCHA
Google reCAPTCHA sets a necessary cookie (_GRECAPTCHA) when executed for the purpose of providing its risk analysis.
179 days
Toggle Google Tag ManagerGoogle Tag Manager
Google Tag Manager simplifies the management of marketing tags on your website without code changes.
Name
Description
Duration
cookiePreferences
Registers cookie preferences of a user
2 years
td
Registers statistical data on users' behaviour on the website. Used for internal analytics by the website operator.
session
Toggle StatisticsStatistics
Statistics cookies collect information anonymously. This information helps us understand how visitors use our website.
Toggle Factors AIFactors AI
Factors.ai is a B2B account intelligence and marketing analytics platform that helps Go-To-Market (GTM) teams identify anonymous website visitors, track buyer journeys, and measure the ROI of marketing campaigns.
Service URL: www.factors.ai (opens in a new window)
Name
Description
Duration
_fuid
It is sent to capture session details and track user behavior across your website to provide behavioral data and intent signals.
1 Year
Toggle Google AnalyticsGoogle Analytics
Google Analytics is a powerful tool that tracks and analyzes website traffic for informed marketing decisions.
Service URL: policies.google.com (opens in a new window)
Name
Description
Duration
FPGSID
Stores a session or user identifier to track how visitors interact with a website. This helps Google Analytics measure website performance, user engagement, and usage patterns.
Session
FPLC
Used by Google Analytics to link visitor interactions and sessions across multiple related domains.
20 hours
FPID
A server-side Google Analytics cookie used as an alternative user identifier when third-party cookies are restricted.
2 years
_ga
ID used to identify users
2 years
_ga_
ID used to identify users
2 years
Toggle Jetpack StatsJetpack Stats
Jetpack's built-in visitor analytics. It records page views, referring sites, search terms, and outbound link clicks, and also carries the shared visitor-tracking library used by Jetpack Instant Search and WooCommerce Analytics.
Service URL: automattic.com (opens in a new window)
Name
Description
Duration
tk_aip
Stores a list of anonymous visitor IDs so they can be merged into one identity once a visitor is recognized.
Up to 5 years
tk_tc
Used once per page load to work out which cookie domain the Tracks library should use, then removed as soon as it's read back.
Session (deleted immediately after use)
tk_qs
Queues analytics events for Jetpack's Tracks library so none are lost if the page closes before they can be sent.
30 minutes
tk_ai
Stores a randomly-generated anonymous visitor ID so Jetpack's Tracks analytics library can link tracking events to the same visitor.
Session in wp-admin; up to 5 years on the frontend
Toggle Microsoft ClarityMicrosoft Clarity
Clarity is a web analytics service that tracks and reports website traffic.
Service URL: clarity.microsoft.com (opens in a new window)
Name
Description
Duration
CLID
Identifies the first-time Clarity saw this user on any site using Clarity.
12 months
ANONCHK
Indicates whether MUID is transferred to ANID, a cookie used for advertising. Clarity doesn't use ANID and so this is always set to 0.
Session
_clck
Persists the Clarity User ID and preferences, unique to that site is attributed to the same user ID.
12 months
_clsk
Connects multiple page views by a user into a single Clarity session recording.
12 months
Toggle Parse.lyParse.ly
Parse.ly is a content analytics platform that helps publishers optimize audience engagement and content performance.
Name
Description
Duration
_parsely_session
JSON document storing information identifying a browsing session according to Parsely’s proprietary definition
30 minutes
_parsely_visitor
JSON document uniquely identifying a browser and counting its sessions
13 months
cookies.js_dtest
This cookie determines whether the browser accepts cookies.
session
Toggle MarketingMarketing
Marketing cookies are used to follow visitors to websites. The intention is to show ads that are relevant and engaging to the individual user.
Toggle Bing / MicrosoftBing / Microsoft
Bing, powered by Microsoft, is a search engine providing web, image, video, and map search capabilities.
Name
Description
Duration
MR
Used to collect information for analytics purposes.
6 months
ANONCHK
Used to store session ID for a users session to ensure that clicks from adverts on the Bing search engine are verified for reporting purposes and for personalisation
10 minutes
SM
Used by Microsoft in synchronizing the MUID across multiple Microsoft domains to track users for advertising.
session
MUID
Identifies unique web browsers visiting Microsoft sites. These cookies are used for advertising, site analytics, and other operational purposes.
1 year
Toggle DoubleClick/Google MarketingDoubleClick/Google Marketing
A comprehensive digital advertising platform for managing campaigns, optimizing performance, and analyzing audience data.
Name
Description
Duration
IDE
This cookie is used for targeting, analyzing and optimisation of ad campaigns in DoubleClick/Google Marketing Suite
2 years
ar_debug
Store and track conversions
Persistent
Toggle LinkedInLinkedIn
LinkedIn is a professional networking platform for job seekers, employers, and industry connections.
Name
Description
Duration
bscookie
Used by LinkedIn to track the use of embedded services.
1 year
AnalyticsSyncHistory
Used to store information about the time a sync with the lms_analytics cookie took place for users in the Designated Countries
30 days
bcookie
Used by LinkedIn to track the use of embedded services.
1 year
li_sugr
Used to make a probabilistic match of a user's identity outside the Designated Countries
90 days
lidc
Used by the social networking service, LinkedIn, for tracking the use of embedded services.
1 day
UserMatchHistory
Used by LinkedIn Ads to synchronize and match user IDs across different ad networks and data providers.
30 days
Toggle LinkedIn InsightLinkedIn Insight
LinkedIn Insight is a web analytics service that tracks and reports website traffic.
Service URL: www.linkedin.com (opens in a new window)
Name
Description
Duration
li_sugr
Used to make a probabilistic match of a user's identity.
90 days
lidc
Used for routing and session management.
24 hours
Toggle LiveIntentLiveIntent
LiveIntent provides a platform for email advertising and identity-driven marketing solutions.
Name
Description
Duration
_lc2_fpi_js
Companion cookie to _lc2_fpi used by JavaScript to facilitate cross-domain ad tracking and user identification.
1 year
_lc2_fpi
First-party tracking cookie usually associated with LiveRamp to identify users across devices for targeted advertising.
1 Year
_li_ss
Sets a unique ID for the visitor, that allows third party advertisers to target the visitor with relevant advertisement. This pairing service is provided by third party advertisement hubs, which facilitates real-time bidding for advertisers.
1 month
lidid
Collects data on visitors' behaviour and interaction - This is used to make advertisement on the website more relevant. The cookie also allows the website to detect any referrals from other websites.
2 years
Toggle Cookie PolicyCookie Policy
You can find more information in our Privacy Policy.
Allow AllDecline All
Accept