/handbook/drupal-to-wordpress-migration-guide/process-and-planning/
What We Do
Digital Platform MigrationsKey SolutionsManaged ServicesStaffing SolutionsIndustriesProducts


Discovery
Strategic consultancy & project roadmap

Growth Services
On demand development & consultation

Site Maintenance
Annual maintenance. Done for you

QE Services
Testing across SDLC for assured quality

Hosting Migration
Move to a performant hosting with zero downtime

WooCommerce
Enterprise commerce delivered without lock-in

AI
Unlock real use cases and integrations

All Services
A suite of services for any need
Technology STACK


eCommerce
Scale your e-commerce with WooCommerce, integrations, and custom extensions for growth.


EasyEngine
Server management tool that makes using WordPress on Nginx easy.

Web Auditor
Performance Audit & Insights for your Website.

rtMedia
A complete media management plugin for WordPress.
Resources


About Us


CLEAR
 Resources How Enterprises Migrate from Drupal to WordPress Migration process, timeline & team
Topics
On this page
- How Enterprises Migrate from Drupal to WordPress
- Business case for migration
- Migration process, timeline & team
- Planning the migration
- Frontend migration
- Content migration
- Backend migration
- Quality assurance
- Site launch
- How can rtCamp help
The Drupal to WordPress migration process
Pre-Migration
Migration
Post-Migration
Project timeline for Drupal to WordPress site migration
Team
1) Project Manager (PM)
2) Engineering Manager (EM)
3) UI/UX Designers
4) Frontend Engineers
5) Backend Engineers
6) QA Engineers
Wrapping it up…
Discovery: Assessment & planning
Frontend visual auditing
Auditing the backend
Content auditing
1. Audit all your existing content
2. Document content structure and dependencies
3. Map Drupal content elements to WordPress equivalents
How rtCamp can help
Get our Drupal to WordPress Migration resource kit
Last updated on May 28, 2026
Planning Drupal to WordPress migration: The process, timeline, & team
Before diving into the actual migration process, let’s establish a clear process, timelines, and assemble the right team to ensure a seamless Drupal to WordPress transition.
The Drupal to WordPress migration process
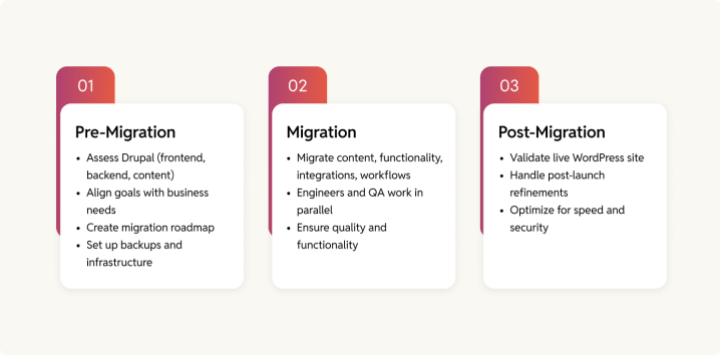
At rtCamp, we follow a structured process for platform migrations. This process builds upon our deep expertise, drawn from successfully executing hundreds of platform migration projects, the majority being Drupal to WordPress migrations. We divide our process into three distinct phases: Pre-Migration, Migration, and Post-Migration.
- Pre-Migration: This phase is all about discovery and planning. We assess the existing Drupal setup—frontend, backend, and content—align migration goals with business needs, and map out a clear, executable roadmap. This is also when we establish backups and set up the required infrastructure for a smooth migration process.
- Migration: Here, we move everything—content, functionality, integrations, and workflows—to WordPress. Our engineers and QA teams work in parallel to ensure that each migrated component meets the required standards and functions as expected.
- Post-Migration: After the new WordPress site goes live, we conduct extensive validation, address any post-launch refinements, and provide ongoing optimizations to ensure peak performance and security.
We’ll now walk you through our process, starting with the Pre-Migration phase—designed for you to use as is or adapt for your project’s needs. This is just an introduction to the process. You will find the implementation details for each in the following chapters.
Pre-Migration
1) Discovery
The discovery phase is the groundwork that sets the stage for a successful Drupal to WordPress conversion, where all the strategic work happens. The discovery phase includes:
- Assessing the existing Drupal stack: Reviewing the frontend, backend, and content to identify the key elements that will be migrated.
- Aligning with business goals: Ensuring the migration aligns with the company’s strategic objectives.
- Stakeholder alignment: Engaging stakeholders to clarify expectations, confirm priorities, and set clear communication channels.
- Planning the migration: Assembling a team, establishing timelines, and setting milestones.
- Creating an executable roadmap: Developing a clear, actionable plan that guides the migration from start to finish.
2) Backups
Before any migration begins, you’ll back up all aspects of the Drupal site, including content, media, custom modules, configurations, and databases. These backups provide a fail-safe, ensuring that you can restore the site to its original state if needed. Backups are naturally a part of the premigration process as having them means you can proceed with confidence.
The project infrastructure setup
In this phase, you’ll establish the necessary infrastructure to carry out the migration. At rtCamp, we typically use a local installation for development and testing, which serves as our main workspace. This environment allows us to perform migrations, test configurations, and verify changes in a controlled setting before deploying to staging or production.
We also integrate GitHub into our infrastructure to streamline the migration process. We’ll talk more about this when we get to the actual migration process.
Migration
Step 1: Frontend migration: Rebuilding the user-facing experience
Drupal’s theming system operates differently from WordPress’s modern block-based and PHP templating approaches. The frontend migration focuses on:
- Recreating the UI on WordPress through a custom WordPress theme or with WordPress’s block-based page building and full-site editing capabilities.
- Ensuring parity in layouts, templates, and interactive elements.
- Implementing a design system to enforce branding consistency
- Creating a library of reusable designs.
- Optimizing for performance by leveraging WordPress-native caching, image optimization, and modern frontend frameworks.
- Factoring in accessibility and inclusivity standards.
Step 2: Backend migration: Rebuilding features, integrations, and workflows
Drupal’s backend architecture is highly modular, often requiring custom-built configurations for functionalities that WordPress can handle more intuitively. Backend migration involves:
- Rebuilding custom features with custom code or through WordPress plugins.
- Recreating content structures through custom post types.
- Rebuilding third-party integrations through native WordPress integration solutions or via custom code.
- Reconfiguring workflows.
- Migrating APIs and external services to maintain or enhance existing integrations.
- Aligning security configurations to ensure enterprise-grade protection within WordPress’s infrastructure.
Step 3: Content migration: Ensuring accuracy, structure, and integrity
Migrating content from Drupal to WordPress isn’t a simple export-import task. Content structures differ significantly, requiring:
- Mapping Drupal’s content types to WordPress post types and taxonomies.
- Migrating structured content, media, and metadata while preserving relationships and hierarchies.
- Ensuring editorial usability by leveraging WordPress’s intuitive block editor for content creation and management.
Maintaining SEO equity is a crucial part of the content migration process. This includes aligning URL structures, implementing redirects, and migrating structured SEO data (such as schema markups, metadata, and SEO configurations).
Post-Migration
Step 1: Testing
The testing phase involves a comprehensive approach to ensure the site functions seamlessly. This includes functional testing to verify that all site features work as intended. User Acceptance Testing (UAT) ensures the site aligns with business requirements and user expectations. Performance testing checks for load times, server response, and scalability under traffic, while security testing ensures that the site is secure, with proper access controls and data protection.
Finally, content testing verifies that all content, including media and links, has been correctly migrated and displayed properly. Each of these testing layers ensures the new WordPress site is robust, secure, and ready for launch. Testing typically happens in the staging environment (which mirrors the live or production environment).
Step 2: Going live
Going live is the final step in the migration process, where the new WordPress site from the staging environment (where it’s tested) replaces the existing Drupal setup in the live/production environment. The DNS switchover happens here.
Step 3: Post-live validation and ongoing optimizations
Once the new WordPress site is live, it’s time for post-live validation and ongoing optimizations. Additional rounds of testing and validation to confirm that everything is working as expected in the live environment go here.
Let’s discuss timelines now.
Project timeline for Drupal to WordPress site migration
The timeline for migrating from Drupal to WordPress depends on the complexity of the project. That said, a typical enterprise migration from Drupal to WordPress can take anywhere from 3 to 6 months. Here’s a general breakdown:
- Weeks 1-2: Discovery & analysis
- Weeks 2-4: Application design
- Weeks 3-10: Development & unit testing
- Weeks 4-8: Migration script development
- Weeks 7-12: System integration testing (SIT) execution & support
- Weeks 10-12: Content migration
- Weeks 12-14: User acceptance testing (UAT)
- Week 14: Deployment to production (Go Live)
- Weeks 14-15: Post-production support
- Weeks 16+: Ongoing support & optimization
Total estimated timeline: 3–6 months
This timeline assumes that the project involves typical enterprise-level complexity and custom features. Larger, more complex migrations could take longer, while smaller migrations may be completed more quickly. But generally, this is how it looks like for most projects:
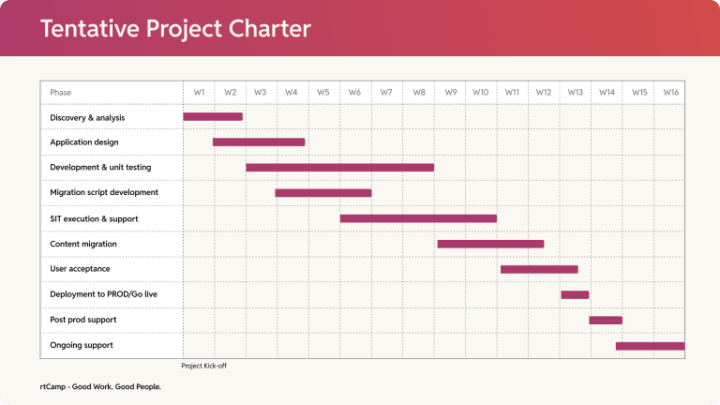
With the process and timeline clear, it’s time to put together a team for your Drupal to WordPress migration project.
Team
Migrating an enterprise Drupal stack to WordPress is quite like a large-scale IT project. You typically need a team of specialized roles that align with both the complexity and the scale of the migration. While each migration is unique, the team structure generally looks like the following.
1) Project Manager (PM)
The Project Manager oversees the entire migration process, from initiation to completion. The PM ensures that all phases of the migration—discovery, development, testing, deployment, and post-launch support—are carried out on time, within scope, and on budget. Sometimes you may also loop in your Directory of Delivery to further streamline the migration process.
2) Engineering Manager (EM)
The Engineering Manager leads the technical direction of the migration. They oversee the technical execution, making sure that the project’s technical requirements are met at every stage.
Their responsibilities also include managing the development team’s workflow, resolving complex technical challenges, and ensuring adherence to best practices in coding and system design. They provide guidance on how to approach custom development and integrations, ensuring smooth transitions from the existing Drupal setup to WordPress.
3) UI/UX Designers
The UI/UX designers are responsible for designing the overall look and feel (the visual identity) of the new WordPress site. This includes selecting color schemes, typography, image styles, and other visual elements that align with the company’s branding guidelines.
Additionally, this role involves developing a comprehensive design system that includes reusable designs for everything from buttons and icons to blocks, sections, and entire pages. The UI/UX designer also ensures that accessibility, performance, and inclusivity considerations are addressed in the design process.
4) Frontend Engineers
Frontend Engineers focus on the user-facing aspect of the migration, translating the designs and layouts from Drupal to WordPress. This team ensures that the new WordPress site has the same or improved look, feel, and user experience as the existing Drupal site. These engineers start working early on in the project basing their work off a starter theme.
5) Backend Engineers
Backend Engineers ensure that every custom functionality, integration, and workflow from Drupal is seamlessly migrated to WordPress, matching or even improving on the original system. They recreate and develop custom user roles, manage Digital Asset Management (DAM) configurations, and design content structures that align with the Drupal setup.
In addition, backend engineers configure security, performance, and compliance measures to ensure the new WordPress site meets enterprise-level standards.
6) QA Engineers
Generally, you involve QA resources as you approach your. But at rtCamp, we work at the intersection of QA (Quality Assurance) and QE (Quality Engineering), so we combine the strengths of both approaches to ensure that the project is not only tested thoroughly but also built with quality in mind from the start.
For us, QA Engineers play a key role throughout the Drupal to WordPress conversion process. Before the migration, they help plan the testing strategy, create test plans, and set up testing tools. During the migration, they perform continuous testing, ensuring data integrity, functionality, and performance by running tests on content, features, integrations, and system performance.
After migration, they conduct post-migration testing, user acceptance testing (UAT), regression testing, and security checks to ensure everything works as expected in the live environment. They continue to monitor the site post-launch for any issues, ensuring that the site remains stable and secure.
Check out more about our approach to QE here.
Wrapping it up…
By following a well-defined process, setting realistic timelines, and assembling the right team, you can ensure a smooth transition with minimal disruptions. Now that it’s covered, we’ll move on to the next crucial step.
Whether your goal is a like-for-like Drupal to WordPress migration or a strategic upgrade, careful planning and execution are key to making the most of your move to WordPress. That’s why, in the next chapter, we’ll dive into the discovery and planning phase—a critical step where we assess your current Drupal setup, identify key requirements, and map out a migration strategy that aligns with your goals.
Discovery: Assessment & planning
To build a functionally equivalent WordPress stack—where you kind of effectively “convert Drupal to WordPress”— you first need a complete understanding of your existing Drupal setup.
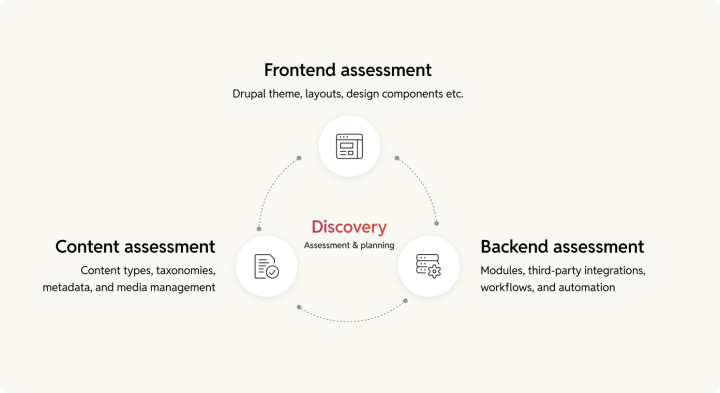
The discovery phase is all about this. You can break down the discovery phase into three core parts:
- Frontend assessment: This is identifying your current Drupal theme, layouts, design components, interactive elements, and user experience features that need to be recreated in WordPress.
- Backend assessment: This is auditing modules, third-party integrations, workflows, and automation that power your site’s functionality.
- Content assessment: This is analyzing content types, taxonomies, metadata, and media management to ensure a smooth transition without disrupting site structure or SEO.
A thorough discovery phase ensures that your WordPress migration isn’t just a rebuild—it’s a strategic upgrade that retains everything essential while optimizing for future growth. Let’s now go over how you can conduct this assessment, starting with the frontend.
Frontend visual auditing
When migrating a website from Drupal to WordPress, preserving the visual design is crucial to maintaining its brand identity and user experience, unless you’re going with a redesign. A visual audit helps with this.
This exercise will help create a brief for your new WordPress theme that will be used to recreate your Drupal site’s user-facing experience when you get to the actual migration. Here’s how you can conduct a thorough frontend visual audit of your current Drupal setup. (This is a fairly manual process.)
The first step in auditing the frontend of your Drupal website is to understand the current design and structure. This includes all visual elements, layout patterns, and user interaction mechanisms that are implemented on your Drupal site.
Key components to evaluate:
Layout and structure
Take stock of the page layout on the Drupal site. Identify the primary design elements such as the header, footer, sidebar, navigation menus, and any specific grid layouts. Look for:
- Header styles (logo placement, navigation menu, search bar, etc.)
- Footer components (copyright, quick links, contact info, social media icons)
- Content area (two-column, three-column layouts, featured images, text, etc.)
- Sidebars (widgetized areas, callouts, dynamic content areas)
- Navigation (main menu, secondary navigation, breadcrumbs)
Design elements
Identify styling and design features such as colors, fonts, typography, buttons, icons, and hover effects. This includes:
- Global styles (typography, font sizes, headings, body text)
- Button styles (primary, secondary, hover states)
- Iconography (social media icons, arrows, interactive elements)
- Color scheme (background colors, text colors, link colors, borders)
Interactive elements
Document how interactive components like forms, sliders, modals, and accordions are structured and styled. This is crucial for making sure that similar interactions are replicated in WordPress.
To facilitate an accurate migration of visual design elements, it’s useful to take screenshots or document the visuals you are auditing. At rtCamp, our discovery reports use lots of snapshots to facilitate this process. These snapshots serve as reference points when building the WordPress frontend. Consider the following visual components:
- Home page: Screenshot the homepage to capture the overall layout, visual components, and note any dynamic sections.
- Content pages: Capture key content pages such as blog posts, landing pages, product pages, and case studies to document layout consistency.
- Modals and popups: If your site uses popups, modals, or lightboxes, document their design and functionality.
- Forms and buttons: Document the visual style of forms (contact forms, search forms, etc.) and buttons, particularly if custom styles are applied.
- Media and visual assets: Take note of all media elements (images, videos, icons) and how they are displayed across pages.
Next, you need to review your existing Drupal stack’s backend as that’s what powers all your work.
Auditing the backend
Backend auditing is mainly about assessing your current modules, third-party integrations, and workflows.
Auditing the modules
Audit all the modules you’ve working on your Drupal stack. Identify all the core, contributed (third-party), and custom modules you’re currently using on your Drupal stack. Also, list WordPress equivalents to those.
1. Drupal core modules/Native Drupal functionalities
These are built-in modules in Drupal that power essential site functionalities. For example, modules such as Node, User, and Taxonomy are all part of the Drupal core and handle essential content management, user management, and categorization.
List all such modules and map them to their WordPress equivalents. For example:
- Node in Drupal is essentially a Post or Page in WordPress.
- User management in Drupal is matched by User Roles and Permissions in WordPress. By default, WordPress allows for varying levels of user permissions, but advanced user management may require a plugin or customizations.
- Taxonomy in Drupal is equivalent to Categories and Tags in WordPress. Custom taxonomies in WordPress can replace custom vocabularies in Drupal.
2. Contributed (third-party) modules
These modules are not part of the Drupal core but provide extended functionality, often built by the Drupal community. Make a list of such modules you’re using and their WordPress equivalents. Also note if they’re a full functional replacement or would need custom coding to be the same.
AreaDrupal moduleA comparable WordPress pluginSEOMetatagYoast SEO or Rank MathFormsWebformGravity Forms or Contact Form 7CachingBoostWP Super Cache or W3 Total Cache
3. Custom modules
If your Drupal site uses custom-built modules to extend its functionality, it’s important to carefully document their purpose, logic, and how they integrate with other systems. This will help you determine the best way to recreate or adapt these features in WordPress.
Custom modules in Drupal are typically replicated in WordPress through custom plugins.
Next comes integrations.
Auditing all third-party integrations
When migrating from Drupal to WordPress, a critical part of recreating the backend is rebuilding all the third-party integrations you have on your website. This process starts by identifying all third-party integrations your Drupal site currently uses.
These integrations can range from external services for marketing automation, CRM systems, and payment gateways to social media integrations and analytics tools. The goal is to ensure that these integrations continue to function seamlessly on your new WordPress platform.
1. Audit existing third-party integrations in Drupal
The first step is to identify all third-party integrations on your Drupal site. These integrations could be implemented using contributed modules, custom modules, or through manual integrations in Drupal. Key integrations to look out for include:
- CRM integrations
- Integrations with marketing automation solutions
- Payment gateways
- Integrations with analytics and tracking
- DAM solutions
And so on.
2. Document the integration flow and usage
Once you’ve identified these integrations, it’s important to document how each one functions and interacts with your Drupal site. Key details to capture include:
- What each integration does: For example, does the CRM integration sync customer data in real-time? Does the marketing automation tool send automated email campaigns based on user actions?
- Frequency of data exchange: Is it a real-time sync, or does it run on a scheduled basis?
- The technology used: Is it API-based, or does it rely on FTP, webhooks, or custom middleware to exchange data?
- Custom logic: Some integrations may have custom workflows or logic embedded within Drupal, so it’s important to map how this functionality will be recreated or replaced in WordPress.
3. Identify WordPress alternatives or recreate the integrations
For each third-party integration, you’ll need to evaluate whether an equivalent plugin or solution exists for WordPress. Thanks to WordPress’s large ecosystem, you’ll likely find native integration solutions for all your needs. In some cases, though, you may need to build a custom plugin that handles the specific integration needs.
Finally, you need to audit your workflows.
Auditing workflows
Auditing your workflows ensures that your business processes and automation are carried over seamlessly to your new WordPress environment. Here’s how to go about it.
1. Audit existing workflows in Drupal
The first step in migrating workflows is to identify all workflows currently in place on your Drupal site. These could involve several systems and processes such as content publication, user permissions, media management, and more.
2. Document the workflow process
Once you’ve identified all active workflows, document each one in detail. The key elements to capture include:
- Workflow steps: Outline the individual steps that make up each workflow. For example, for a content approval workflow, you may have stages like drafting, editing, approval, and publishing.
- Roles and responsibilities: Document which user roles are responsible for each step. For example, an editor may be responsible for reviewing and editing content, while an administrator might be tasked with approving it.
- Triggers and actions: Identify what triggers each workflow (e.g., a user submitting a post or an admin approving it) and what actions occur (e.g., notifying the next step’s participants).
- Tools used: If specific modules or tools are being used to manage these workflows (e.g., Drupal Workflows module, Content Moderation), make sure to document them as well. These tools may have direct equivalents or alternatives in WordPress.
Also, each workflow will likely depend on data from multiple sources. Documenting these data dependencies ensures that the workflow operates correctly during the migration process. For instance, the approval workflow for content may rely on specific post metadata or taxonomy terms that need to be preserved during the migration.
3. Identify WordPress equivalents for workflows
With a clear understanding of your existing workflows, the next step is to identify how these processes can be replicated or optimized within WordPress. Below are common types of workflows and their WordPress equivalents. For example, WordPress does not natively offer content moderation workflows like Drupal, but plugins such as Edit Flow or User Role Editor can provide role-based content approval workflows.
For workflows that are highly customized or are not directly replicable using WordPress plugins, it may be necessary to build custom workflows in WordPress using the WordPress REST API, WP Cron for scheduled tasks, and Action Hooks to trigger actions across workflows.
Content auditing
Content auditing is another crucial step in the discovery phase, ensuring that all content—pages, posts, media, taxonomies, and metadata—transfers correctly while preserving structure, relationships, and functionality when the actual migration happens.
1. Audit all your existing content
The first step in migrating content is to understand and audit the content structure in your existing Drupal site. Content in Drupal can exist in many different forms, and may be managed via custom content types, taxonomy, fields, or modules like Views and Panels. Here are the key elements to assess:
- Content types: In Drupal, content is typically organized into different content types (e.g., articles, blog posts, landing pages, case studies). Identify all the content types you are using and document the fields associated with them (e.g., text fields, image fields, file uploads, custom taxonomies).
- Taxonomies and categories: Taxonomy is a critical part of Drupal’s content structure. Identify the taxonomies (e.g., tags, categories, custom vocabularies) and how they are applied to content. Mapping these to equivalent categories or tags in WordPress is essential for maintaining content structure.
- Content relationships: Many Drupal sites have content that’s related or interlinked, such as related articles or products, or content embedded in custom blocks or views. These relationships need to be carefully mapped to WordPress, potentially using custom taxonomies, plugins, or internal linking strategies.
- Media management: Drupal’s media management system is often highly customized. This includes file types (e.g., images, videos, PDFs), image styles, and media embedding. Assess how these media assets are handled in Drupal and how they will be moved to WordPress.
- Custom fields and metadata: Custom fields in Drupal might store extra content like metadata, tags, SEO data, and custom attributes. You need to identify these fields and their values for migration, ensuring that custom data is retained in WordPress.
- SEO elements: SEO metadata like titles, descriptions, and keywords might be managed through modules like Metatag or Pathauto in Drupal. Identify these fields and map them to WordPress’ SEO tools (e.g., Yoast SEO, Rank Math).
2. Document content structure and dependencies
Once you have identified all the content types in your Drupal site, the next step is to document their structure and relationships to ensure an accurate migration. Key elements to document include:
- Content types and fields: List each content type along with its associated fields (text, number, image, file, etc.). Note any custom fields or structured data that will need to be recreated in WordPress.
- Content relationships: Identify how different content types relate to one another (e.g., author profiles linked to articles, product pages linked to categories).
- Taxonomies: Catalog all taxonomy terms (tags, categories, vocabularies) and determine how they should map to WordPress equivalents.
- Media assets: List all media files (images, videos, PDFs) and their storage paths to ensure they can be properly migrated into WordPress’s Media Library.
- SEO metadata: Ensure all SEO-related elements (meta titles, descriptions, URL aliases) are documented for transfer into WordPress SEO plugins like Yoast or Rank Math.
3. Map Drupal content elements to WordPress equivalents
With a clear inventory of your existing content, the next step is to define how each element will be implemented in WordPress:
- Content Types → Post Types: Map Drupal content types to WordPress Post Types (Posts, Pages, or Custom Post Types if needed). Example: A case study content type in Drupal may map to a Custom Post Type (CPT) in WordPress using Custom Post Type UI or code.
- Taxonomies → Categories/Tags/Custom Taxonomies: Convert Drupal’s taxonomy vocabularies to WordPress categories, tags, or custom taxonomies as needed. Example: A Product Category taxonomy in Drupal should be recreated as a Product Category in WordPress.
- Custom Fields → WordPress Custom Fields/ACF: Drupal often uses structured custom fields for content. These may need to be recreated using WordPress Custom Fields or Advanced Custom Fields (ACF) for complex data types.
- Media Handling → WordPress Media Library: Ensure all Drupal media files are imported into WordPress’s Media Library, maintaining proper associations and alt text. Tools like WP Media Folder can help organize assets.
- SEO Metadata → SEO Plugins: Migrate SEO data from Drupal modules (e.g., Metatag, Pathauto) to Yoast SEO or Rank Math to retain meta descriptions, titles, and canonical URLs.
At this step, you should have a fully documented content structure and a clear migration plan that maps all Drupal content elements to their WordPress equivalents.
At the end of the discovery phase, you should have:
- A comprehensive audit of your frontend, detailing layouts, design components, interactive elements, and branding that need to be recreated in WordPress.
- A detailed backend assessment, mapping all modules, third-party integrations, and workflows to their WordPress equivalents.
- A structured content inventory, ensuring all content types, taxonomies, metadata, and media assets are accounted for and mapped correctly.
Additionally, you should also have a clear migration strategy, outlining how each component will be transitioned to WordPress. With this groundwork in place, you’ll be ready to execute a seamless, well-planned migration to WordPress.
With the assessment complete, we’re now ready to start the migration process!
How rtCamp can help
If you’d like to get a head start with this discovery phase, book a free consultation with us. You’ll get 20 hours of a scoping exercise to map out your migration.Alternatively, we can handle the entire discovery phase for you, providing a comprehensive migration playbook that you can execute in-house or with your preferred partners—or have us take care of it for you. Check out our discovery services to get started.
Get our Drupal to WordPress Migration resource kit
Sample SOW, Contract, NDA, MSA & More
Δ
First name(Required)
Last name
Email(Required)
Get the kit
Business case for migration
PREVIOUS
Credits

Disha Sharma
Author
Disha Sharma
Author
Disha Sharma is a Content Writer at rtCamp with over a decade of experience at the intersection of technology, digital marketing, and enterprise content strategy. Her WordPress roots run deep, her …

Aviral Mittal
Editor
Aviral Mittal
Editor
Aviral Mittal is the Chief Marketing Officer at rtCamp, where he established and leads the marketing function, building and growing a team of 20+ specialists across content, SEO, design, and growth…

Good Work. Good People.
Industry partnerships


Compliance certifications


 United States India
© rtCamp Inc. since 2009. All rights reserved.
Terms of Service · Privacy Policy · Trust Center
Company
Solutions
Subscribe to our newsletter and get a few email updates every month.
United States India
© rtCamp Inc. since 2009. All rights reserved.
Terms of Service · Privacy Policy · Trust Center
Cookie Consent
We value your privacy
We use cookies to give you the best possible experience. By clicking “Accept,” you consent to our use of cookies to improve site functionality, analyze usage, and personalize content and communications. Your privacy matters to us, and we are committed to handling your data responsibly and transparently. Please check our Privacy Policy for more details.
Manage PreferencesDon’t AllowAllow All
Why do we use cookies?
×
By clicking "Accept" or "Decline All" at the bottom, you consent to the use of cookies and other tools as described in our Cookie Policy in accordance with your settings and accept our Terms of Service.
Toggle EssentialEssential
Essential cookies enable basic functions and are necessary for the proper function of the website.
Name
Description
Duration
Geolocation Config
This cookie is used to store the consent settings based on the visitor's location.
30 days
Cookie Preferences
This cookie is used to store the user's cookie consent preferences.
30 days
Toggle CloudFlareCloudFlare
CloudFlare provides web performance and security solutions, enhancing site speed and protecting against threats.
Service URL: developers.cloudflare.com (opens in a new window)
Name
Description
Duration
cf_clearance
Whether a CAPTCHA or Javascript challenge has been solved.
session
Toggle CommentsComments
These cookies are needed for adding comments on this website.
Name
Description
Duration
comment_author
Used to track the user across multiple sessions.
Session
comment_author_email
Used to track the user across multiple sessions.
Session
comment_author_url
Used to track the user across multiple sessions.
Session
Toggle GodamGodam
GoDAM" is primarily a specialized WordPress plugin and media management service designed to enhance video hosting, marketing, and asset management directly within the WordPress dashboard.
Service URL: godam.io (opens in a new window)
Name
Description
Duration
user_image
Temporarily stores the path to the user's avatar or profile picture for quick rendering in the website header.
session
user_id
Stores the numerical ID of the logged-in user to maintain session continuity and basic site operations.
session
full_name
Stores the logged-in user's display name to personalize the site interface without needing database queries.
session
system_user
First-party cookie used to store basic application state identifying the current system user role.
session
sid
A generic session ID cookie used to maintain user state and functionality as the visitor navigates through the site.
session
Toggle Google reCAPTCHAGoogle reCAPTCHA
Google reCAPTCHA helps protect websites from spam and abuse by verifying user interactions through challenges.
Name
Description
Duration
_GRECAPTCHA
Google reCAPTCHA sets a necessary cookie (_GRECAPTCHA) when executed for the purpose of providing its risk analysis.
179 days
Toggle Google Tag ManagerGoogle Tag Manager
Google Tag Manager simplifies the management of marketing tags on your website without code changes.
Name
Description
Duration
cookiePreferences
Registers cookie preferences of a user
2 years
td
Registers statistical data on users' behaviour on the website. Used for internal analytics by the website operator.
session
Toggle StatisticsStatistics
Statistics cookies collect information anonymously. This information helps us understand how visitors use our website.
Toggle Factors AIFactors AI
Factors.ai is a B2B account intelligence and marketing analytics platform that helps Go-To-Market (GTM) teams identify anonymous website visitors, track buyer journeys, and measure the ROI of marketing campaigns.
Service URL: www.factors.ai (opens in a new window)
Name
Description
Duration
_fuid
It is sent to capture session details and track user behavior across your website to provide behavioral data and intent signals.
1 Year
Toggle Google AnalyticsGoogle Analytics
Google Analytics is a powerful tool that tracks and analyzes website traffic for informed marketing decisions.
Service URL: policies.google.com (opens in a new window)
Name
Description
Duration
FPGSID
Stores a session or user identifier to track how visitors interact with a website. This helps Google Analytics measure website performance, user engagement, and usage patterns.
Session
FPLC
Used by Google Analytics to link visitor interactions and sessions across multiple related domains.
20 hours
FPID
A server-side Google Analytics cookie used as an alternative user identifier when third-party cookies are restricted.
2 years
_ga
ID used to identify users
2 years
_ga_
ID used to identify users
2 years
Toggle Jetpack StatsJetpack Stats
Jetpack's built-in visitor analytics. It records page views, referring sites, search terms, and outbound link clicks, and also carries the shared visitor-tracking library used by Jetpack Instant Search and WooCommerce Analytics.
Service URL: automattic.com (opens in a new window)
Name
Description
Duration
tk_aip
Stores a list of anonymous visitor IDs so they can be merged into one identity once a visitor is recognized.
Up to 5 years
tk_tc
Used once per page load to work out which cookie domain the Tracks library should use, then removed as soon as it's read back.
Session (deleted immediately after use)
tk_qs
Queues analytics events for Jetpack's Tracks library so none are lost if the page closes before they can be sent.
30 minutes
tk_ai
Stores a randomly-generated anonymous visitor ID so Jetpack's Tracks analytics library can link tracking events to the same visitor.
Session in wp-admin; up to 5 years on the frontend
Toggle Microsoft ClarityMicrosoft Clarity
Clarity is a web analytics service that tracks and reports website traffic.
Service URL: clarity.microsoft.com (opens in a new window)
Name
Description
Duration
CLID
Identifies the first-time Clarity saw this user on any site using Clarity.
12 months
ANONCHK
Indicates whether MUID is transferred to ANID, a cookie used for advertising. Clarity doesn't use ANID and so this is always set to 0.
Session
_clck
Persists the Clarity User ID and preferences, unique to that site is attributed to the same user ID.
12 months
_clsk
Connects multiple page views by a user into a single Clarity session recording.
12 months
Toggle Parse.lyParse.ly
Parse.ly is a content analytics platform that helps publishers optimize audience engagement and content performance.
Name
Description
Duration
cookies.js_dtest
This cookie determines whether the browser accepts cookies.
session
_parsely_session
JSON document storing information identifying a browsing session according to Parsely’s proprietary definition
30 minutes
_parsely_visitor
JSON document uniquely identifying a browser and counting its sessions
13 months
Toggle SalespanelSalespanel
Salespanel is a B2B marketing and sales software that identifies, tracks, and qualifies website visitors and leads in real-time using first-party data. It helps businesses monitor customer journeys, score leads based on behavior, and syncs this data with CRMs (like Pipedrive or HubSpot) to improve conversion rates.
Service URL: salespanel.io (opens in a new window)
Name
Description
Duration
track_uid
Identify and tracking a lead
12 moths
Toggle MarketingMarketing
Marketing cookies are used to follow visitors to websites. The intention is to show ads that are relevant and engaging to the individual user.
Toggle Bing / MicrosoftBing / Microsoft
Bing, powered by Microsoft, is a search engine providing web, image, video, and map search capabilities.
Name
Description
Duration
MR
Used to collect information for analytics purposes.
6 months
ANONCHK
Used to store session ID for a users session to ensure that clicks from adverts on the Bing search engine are verified for reporting purposes and for personalisation
10 minutes
SM
Used by Microsoft in synchronizing the MUID across multiple Microsoft domains to track users for advertising.
session
MUID
Identifies unique web browsers visiting Microsoft sites. These cookies are used for advertising, site analytics, and other operational purposes.
1 year
Toggle DoubleClick/Google MarketingDoubleClick/Google Marketing
A comprehensive digital advertising platform for managing campaigns, optimizing performance, and analyzing audience data.
Name
Description
Duration
IDE
This cookie is used for targeting, analyzing and optimisation of ad campaigns in DoubleClick/Google Marketing Suite
2 years
ar_debug
Store and track conversions
Persistent
Toggle LinkedInLinkedIn
LinkedIn is a professional networking platform for job seekers, employers, and industry connections.
Name
Description
Duration
bscookie
Used by LinkedIn to track the use of embedded services.
1 year
AnalyticsSyncHistory
Used to store information about the time a sync with the lms_analytics cookie took place for users in the Designated Countries
30 days
bcookie
Used by LinkedIn to track the use of embedded services.
1 year
li_sugr
Used to make a probabilistic match of a user's identity outside the Designated Countries
90 days
lidc
Used by the social networking service, LinkedIn, for tracking the use of embedded services.
1 day
UserMatchHistory
Used by LinkedIn Ads to synchronize and match user IDs across different ad networks and data providers.
30 days
Toggle LinkedIn InsightLinkedIn Insight
LinkedIn Insight is a web analytics service that tracks and reports website traffic.
Service URL: www.linkedin.com (opens in a new window)
Name
Description
Duration
li_sugr
Used to make a probabilistic match of a user's identity.
90 days
lidc
Used for routing and session management.
24 hours
Toggle LiveIntentLiveIntent
LiveIntent provides a platform for email advertising and identity-driven marketing solutions.
Name
Description
Duration
_lc2_fpi_js
Companion cookie to _lc2_fpi used by JavaScript to facilitate cross-domain ad tracking and user identification.
1 year
_lc2_fpi
First-party tracking cookie usually associated with LiveRamp to identify users across devices for targeted advertising.
1 Year
_li_ss
Sets a unique ID for the visitor, that allows third party advertisers to target the visitor with relevant advertisement. This pairing service is provided by third party advertisement hubs, which facilitates real-time bidding for advertisers.
1 month
lidid
Collects data on visitors' behaviour and interaction - This is used to make advertisement on the website more relevant. The cookie also allows the website to detect any referrals from other websites.
2 years
Toggle Cookie PolicyCookie Policy
You can find more information in our Privacy Policy.
Allow AllDecline All
Accept